1. Moving (without vision)
Intended to test basic robot motor control. No use of vision allowed.

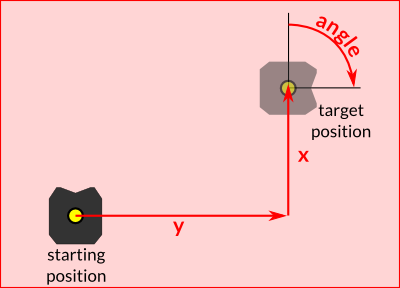
Your robot will be placed on the floor at a set position. You will be given a target displacement in X (forward/backward, forward is positive) and Y (sideways, right is positive) co-ordinates and a specified orientation (rotation) to perform. Clockwise rotation is positive. You will enter these values and your robot must move and turn autonomously, without the vision system, to the specified end position and orientation.
You will do this precisely three times:
- After a successful trial a new displacement and rotation will be given;
- After a failed trial you can choose to try again with the same values, or change to new ones
Success for displacement is defined as moving so that the specified point is inside your robot's circumference. Success for orientation is orientating the robot so its major axis is within 30° of the specified orientation with respect to your robot's starting orientation.
Marking:
- 0 marks Nothing
- 1 mark 1 or 2 successes on positioning
- 2 marks 3 successes on positioning
- plus 1/2 mark 1 success on orientation
- plus 1 mark 2 or 3 successes on orientation
2. Kicking
Your robot will be placed on the pitch. You will be asked to kick the ball straight ahead over the following distances: 50cm, 100cm, 150cm. You must command your robot to kick the ball so it comes to rest within a circle 50cm in diameter centred at the specified distance.
You will have three trials in total:
- After a successful trial a new distance will be given;
- After a failed trial you can choose to try again with the same distance, or change to a new one
Marking:
3. Communications and Timing
This task tests that you have reliable communications with your robot, and that you can use the i2c bus on your robot (as you do to speak to the motor board and the encoder board).
You will be given a "binary" file of less than 250 bytes. These bytes can be anything, i.e. hex 0x00-0xFF
You must send these bytes from your controlling PC to your Arduino. Your Arduino must output the data, byte by byte, through i2c, sending a byte every 20ms-1000ms. You will be told the period during the milestone, and you don't need to be very accurate (seriously, really inaccurate is fine).
We expect that you will actually send the file byte by byte over the RF, and then have your Arduino relay the byte to the i2c as soon as it gets it. You are welcome to send it all to the Arduino and buffer it, but that's making things more complicated.
You should send the bytes from your Arduino to the i2c address 0x45 (decimal 69). You can use the Arduino Wire library - have a look at how commands are sent to the motor board, it's the exact same thing.
Technical notes:
The tolerance with respect to the timing is large. We'll check the mean and the standard deviation, but basically you should be able to do something like:
| On your controlling PC: | On your Arduino: | |
read the input file byte by byte |
loop(){ |
So on the Arduino just have a bit in your main loop for checking if you've received a byte, and then send it on straight away through the i2c.
You’ll need to make an I2C port available on your robot, or leave a dangling i2c cable to connect to. This will be used to attach a standard evaluation mechanism which will check reception.
You do not need to change any of your RF settings, nor i2c speed or anything like that.
Notes:
We do not want you to waste time getting the timing perfect, we're more interested in seeing that you can reliably send data from the PC to your robot.
You should not spend any great deal of time writing code specific for this test. Just write a simple python/c++/java program for iterating through the input file (e.g. for Python), and add a command to your Arduino program to forward a received byte to the i2c address given.
Marking:
Two trials only.
You must get at least half of the bytes through successfully.